Brisket Cutting Guide: How to Slice the Flat and Point Correctly
To cut brisket effectively, start by trimming excess fat to a uniform 1/4-inch cap. Remove seam fat for even cooking.
Identify the grain direction. The flat runs lengthwise, while the point grain is irregular. Always slice against the grain using a sharp, flexible slicing knife for tender, juicy cuts.
Separate the point and flat along the fat seam. Rotate the point 90 degrees to maintain grain alignment. Master these steps to guarantee perfect texture and flavor.
Advanced techniques further enhance your brisket carving skills.
Key Takeaways
- Identify and follow the grain direction; slice brisket perpendicular to the grain for optimal tenderness and to shorten muscle fibers.
- Separate the point from the flat along the fat seam, then rotate the point 90 degrees before slicing against its changing grain.
- Use a long, sharp, flexible slicing knife and smooth single strokes to preserve juices and avoid tearing fibers.
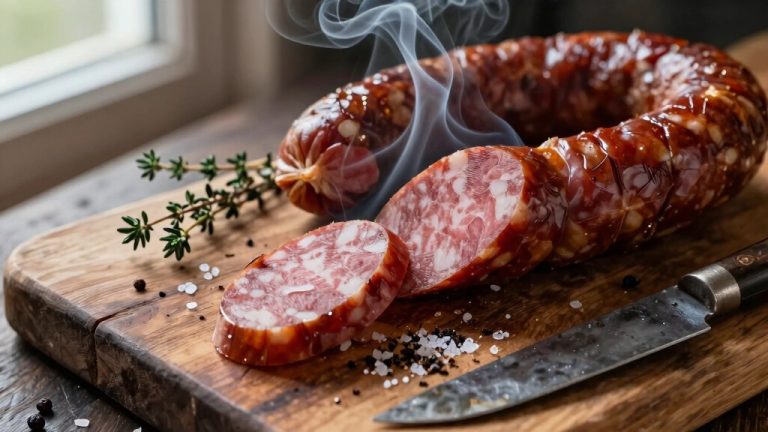
- Maintain consistent slice thickness: about 1/4 inch for the flat and 3/8 to 1/2 inch for the point, tapering slightly for variable thickness.
- Rest brisket until internal temperature reaches 140–150°F, then slice to retain juiciness and improve tenderness.
Trimming Your Brisket for Even Cooking

Before you start cooking, trimming your brisket properly is essential for even heat distribution and peak flavor.
Retain about a 1/4-inch fat cap, smoothing it evenly while removing any thicker deposits to guarantee consistent rendering.
Keep a 1/4-inch fat cap, evenly smoothed, to ensure consistent fat rendering during cooking.
Eliminate excess surface fat and the hard seam fat between the flat and point; this prevents uneven cooking and facilitates uniform trimming later.
Shape the edges by rounding thin flaps and removing loose pieces, promoting optimal smoke circulation and heat penetration.
Trimming before cooking also exposes the grain, aiding subsequent slicing.
Maintaining a consistent thin fat layer protects the meat from drying out and adds flavor during the cook.
Precise, measured trimming ensures heat reaches all muscle fibers uniformly, maximizing tenderness and juiciness throughout the brisket.
For the most accurate cooking results, insert your temperature probe into the thickest part of the flat muscle to monitor internal doneness accurately.
Identifying and Following the Grain in Brisket
Before you start cutting, it’s super important to identify the grain direction. For the flat part of the brisket, the grain usually runs lengthwise along the meat. If you can’t see the grain right away, don’t worry! Just give the ends of the brisket a gentle pull to help reveal the fiber alignment.
Oh, and keep in mind that the point section has a different grain pattern—it’s often more irregular. So, once you expose that part, take a moment to recheck the grain direction there too. It’ll make a big difference in how your slices turn out!
Remember to rotate the point section 90 degrees before slicing due to the grain direction change for the best tenderness.
Grain Direction Basics
Mastering the grain direction is essential for achieving tender, evenly sliced brisket.
The grain refers to the alignment of muscle fibers, which run lengthwise along the flat and more irregularly in the point.
Before cutting, identify this direction carefully. Slicing against the grain shortens muscle fibers, improving tenderness.
To confirm grain orientation, gently pull the brisket ends apart or examine a trimmed end piece before cooking.
Since the flat and point have different grain patterns, always reassess when shifting between these cuts.
Ignoring grain direction results in tough, stringy slices.
Maintain consistent perpendicular slicing with a sharp knife to preserve texture and juiciness.
Following the grain’s direction precisely enables you to maximize tenderness and optimize the eating experience in every slice.
For optimal results, insert the temperature probe horizontally into the flat muscle to monitor doneness accurately before slicing.
Visualizing The Grain
Visualizing the grain in a brisket demands keen observation and understanding of muscle fiber alignment, which guides your slicing for peak tenderness.
You’ll need to identify the direction of the fibers clearly before cutting. Follow these steps:
- Examine the flat cut lengthwise, noting the parallel muscle fibers running along its longer side.
- If the grain isn’t obvious, gently pull the brisket ends apart to reveal fiber orientation.
- Trim excess fat and seam pockets before cooking to expose the grain more distinctly.
- Check the grain direction again when separating the point from the flat, as it often runs differently.
Because the brisket point has a complex muscle structure with changing grain direction, adjusting your slicing angle is essential for optimal tenderness and texture, especially when working with the brisket point.
Grain Changes In Point
Grain patterns in the point cut often shift and twist, requiring careful attention to follow their changing direction. Unlike the flat, the point’s grain is irregular and can run diagonally or curve back on itself. Before slicing, examine the point closely, identifying seam fat as a natural boundary and rechecking grain orientation frequently to maintain ideal tenderness.
Use this guide to track grain changes:
| Section | Grain Direction | Cutting Tip |
|---|---|---|
| Thick end | Diagonal, twisting | Slice perpendicular to grain |
| Middle | Curved, irregular | Adjust angle per curve |
| Thin tip | Almost parallel | Maintain consistent cuts |
| Seam fat area | Grain boundary | Use seam as slicing guide |
| Shift zone | Varies sharply | Reassess grain after each cut |
Following these shifts guarantees you cut against the grain throughout the point, maximizing tenderness. Proper resting time after smoking helps redistribute juices, making each slice tender and flavorful.
Picking the Right Knives and Tools for Brisket
When it comes to slicing up a brisket, you’ll want to grab a long, sharp slicing knife with a flexible blade. This is key for making those clean cuts while following the grain—trust me, it makes a difference!
And don’t forget about a sturdy boning knife. It’s perfect for trimming off that excess fat and separating the point from the flat. You’ll find it super handy!
Oh, and let’s talk about your cutting board and meat fork. A good cutting board gives you the stability you need, and a meat fork will help keep everything in place while you make those precise cuts.
For best results, remember to slice the brisket when it has rested to about 140–150°F internal temperature to retain maximum juiciness and tenderness.
Essential Knife Types
Selecting the right knives and tools is crucial for efficient brisket preparation and slicing. You need knives that offer precision, control, and durability to handle brisket’s complex textures. Here are four essential knife types you’ll rely on:
- Boning Knife: A narrow, flexible blade ideal for trimming fat and removing hard seam fat with accuracy.
- Slicing Knife: Long and straight, perfect for smooth, even cuts across the grain without tearing fibers.
- Chef’s Knife: Versatile for initial trimming and shaping the brisket edges before cooking.
- Utility Knife: Useful for detailed tasks like removing small fat pockets or adjusting slices.
Using these knives correctly will maximize tenderness and presentation. This ensures clean cuts that preserve brisket’s moisture and texture. For best results, freeze trimmings until edges are solid but pliable to facilitate easier handling and precise cutting.
Recommended Cutting Tools
Building on the knife types introduced earlier, choosing the right cutting tools tailored specifically for brisket can markedly enhance your efficiency and results.
You need a long, sharp slicing knife, ideally 10 to 14 inches, with a flexible blade to perform smooth, single-stroke cuts against the grain.
A boning knife with a narrower, curved blade aids in trimming fat and separating the flat from the point precisely.
Additionally, a sturdy carving fork or tongs help stabilize the brisket while slicing without compressing the meat.
Keep your knives razor-sharp; dull blades tear fibers and cause uneven cuts.
A quality sharpening steel or stone is essential to maintain the blade’s edge throughout the process, ensuring clean, consistent slices that retain juices and maximize tenderness.
For best results, always insert the knife to cut against the grain, especially when slicing the flat, to preserve the brisket’s tender texture.
How to Slice the Brisket Flat?
Begin slicing the brisket flat at the corner opposite the point, cutting directly across the grain toward the point. This guarantees you cut against the muscle fibers, maximizing tenderness.
Start slicing the brisket flat from the corner opposite the point, cutting across the grain for optimal tenderness.
Use a long, sharp, flexible knife and smooth single strokes to preserve juices. Maintain consistent slice thickness—about 1/4 inch—to keep texture uniform.
Follow these steps:
- Identify the grain direction clearly before each cut, adjusting the brisket’s position as needed.
- Slice steadily, letting the knife do the work without forcing through the meat.
- Keep slices even and perpendicular to the grain throughout the length of the flat.
- Avoid stacking slices tightly; stagger them to allow heat and steam to escape.
This technique preserves the brisket’s bark and juiciness for prime flavor and presentation. For best results, ensure the brisket has been rested at temperatures above 140°F to maintain moisture and tenderness before slicing.
Separating and Slicing the Brisket Point
Separate the brisket point by slicing carefully along the fat seam where it meets the flat, exposing its distinct grain pattern.
Once separated, slice the point in half lengthwise, then rotate each half to maintain a perpendicular angle to the grain.
Use a sharp, flexible knife to make smooth, single strokes, cutting the point into slices roughly 3/8 to 1/2 inch thick.
Begin with even slices, tapering slightly to accommodate the point’s variable thickness.
Constantly check for and trim away any remaining seam fat or dry ridges, reserving these for burnt ends.
Adjust slice length and thickness as needed to balance the rich marbling against leaner sections, ensuring each piece offers prime texture and flavor.
This method preserves tenderness and highlights the point’s unique characteristics.
For optimal juiciness and tenderness, it is important to consider the stall temperature when cooking the brisket before slicing.
Techniques to Keep Brisket Juicy During Slicing
Maintaining brisket juiciness during slicing relies on cutting with the grain and using smooth, controlled strokes to minimize fiber damage and juice loss.
You want to preserve the internal moisture by handling the meat carefully throughout the process.
Follow these techniques to keep your brisket juicy:
- Always slice against the grain to shorten muscle fibers, enhancing tenderness and reducing juice leakage.
- Use a sharp, flexible knife and execute long, single strokes with consistent pressure. Avoid sawing motions that tear fibers.
- Keep slice thickness consistent, ideally around 1/4 inch for the flat, to maintain even moisture retention.
- Rest the brisket adequately before slicing. Warm meat holds juices better during cutting.
Applying these disciplined methods guarantees your brisket remains moist and flavorful with every slice.
Handling Fat and Burnt Ends After Slicing
When you’re done slicing, set aside the trimmed fat and burnt ends carefully for separate handling. These fatty trimmings and burnt ends hold concentrated flavor and texture distinct from the lean brisket slices.
Collect them in a clean container to prevent contamination and preserve quality. Fat trimmings can be rendered down to produce beef tallow, enhancing other dishes or used for cooking.
Burnt ends, typically from the point’s tips, benefit from either reheating or slow braising to tenderize and intensify their smoky, caramelized crust. Avoid mixing these remnants directly with lean slices to maintain ideal texture and presentation.
Proper handling guarantees you maximize the yield and culinary potential of every brisket component without compromising the main cut’s integrity or serving quality.
Storing and Serving Sliced Brisket for Freshness
After setting aside the fat trimmings and burnt ends, focus on preserving the sliced brisket’s quality by storing it properly. To maintain freshness and juiciness, follow these steps:
- Cool the slices at room temperature for no more than 30 minutes to prevent bacterial growth.
- Layer slices loosely with parchment paper to avoid compression and moisture loss.
- Store brisket in an airtight container or vacuum-sealed bag to limit oxygen exposure and slow oxidation.
- Refrigerate promptly at or below 40°F; consume within 3–4 days for prime flavor and texture.
For serving, gently reheat slices using low, indirect heat or a warm oven to preserve tenderness without drying. Avoid microwaving, which can unevenly heat and toughen the meat. This approach guarantees each slice delivers peak brisket quality.
Frequently Asked Questions
What Is the Ideal Cooking Temperature for Brisket?
You should cook brisket low and slow, aiming for an internal temperature between 195°F and 205°F.
This range breaks down connective tissues, ensuring tenderness and juiciness. Use a reliable meat thermometer to monitor the temperature accurately.
Keep your smoker or oven steady around 225°F to 250°F to allow even cooking. Avoid rushing the process; brisket needs time to render fat and develop flavor without drying out.
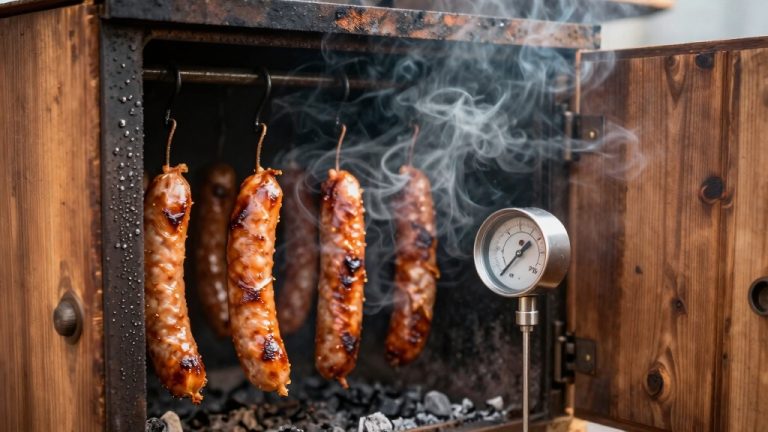
How Long Should Brisket Be Smoked for Best Flavor?
You shouldn’t rush it; smoke your brisket for about 1 to 1.5 hours per pound at 225°F to release the best flavor.
Too fast, and you’ll miss the magic of collagen breaking down, resulting in toughness. Patience is your secret weapon; low and slow guarantees tenderness and smoke penetration.
Aim for an internal temperature around 195-205°F, then let it rest well to redistribute juices before slicing.
Can Brisket Be Cooked in a Slow Cooker Instead of Smoked?
Yes, you can cook brisket in a slow cooker instead of smoking it.
Slow cooking uses moist heat at low temperatures, which breaks down connective tissue and produces tender meat.
However, you won’t get the smoky flavor or bark that smoking imparts.
To enhance flavor, use a dry rub or marinade.
Consider finishing the brisket under a broiler or on a grill to mimic the crust and caramelization of smoking.
What Wood Types Are Best for Smoking Brisket?
For smoking brisket, you want hardwoods like oak, hickory, or pecan. They provide a strong, smoky flavor that complements beef well.
Mesquite works if you prefer an intense, bold smoke but use it sparingly to avoid bitterness.
Fruitwoods like apple or cherry add a mild, sweet aroma and subtle fruitiness, perfect for a balanced profile.
Always choose well-seasoned wood to maintain steady combustion and avoid acrid smoke. This ensures your brisket develops deep, rich flavors.
How Do I Reheat Leftover Sliced Brisket Without Drying It Out?
Don’t worry about drying out your leftover brisket when reheating. To keep it moist, wrap slices tightly in foil with a splash of beef broth or au jus.
Heat at low temperature, around 250°F, in the oven for 20-30 minutes until warmed through. This gentle method preserves juiciness and tenderness by preventing fiber contraction and moisture loss.
Avoid microwaving, which cooks unevenly and squeezes out precious juices.
How to Properly Cut a Brisket After Smoking
You’ll trim your brisket for even cooking, follow the grain for clean cuts, and choose the right knives for precision. You’ll slice the flat and separate the point with care, maintain juiciness through controlled slicing, and manage fat and burnt ends efficiently.
You’ll store and serve your brisket to preserve freshness. Master these steps with confidence, consistency, and attention to detail, and you’ll elevate every brisket to perfection.