Smoked Grouse Recipe: Step-by-Step Guide to Rich Flavor
Choose a fresh wild grouse, then brine it 6-12 hours in a blend of kosher salt, brown sugar, herbs, and spices for tender, flavorful meat.
Rinse and dry the bird to form a tacky pellicle, then smoke over seasoned hardwood like hickory or cherry at about 220°F until juicy and smoky.
Baste periodically with a garlic-herb butter for richness. Rest before slicing thin and serving. Ready to unveil all the secrets for perfect smoked grouse?
Key Takeaways
- Choose fresh, wild-caught grouse, clean thoroughly, and spatchcock for even smoking and better smoke penetration.
- Brine the grouse 6-12 hours in a salted, sweetened, and aromatic liquid kept cold to enhance tenderness and flavor.
- Dry the bird to form a tacky pellicle, then select seasoned hardwoods like hickory or cherry for balanced smoky flavor.
- Smoke at 220°F for several hours, basting with herb and butter mixture, and add wood chips during the last hour for fresh smoke.
- Rest smoked grouse 10-15 minutes before slicing thinly against the grain and serve with berry sauces or complementary greens.
Selecting and Preparing the Grouse
When selecting grouse for smoking, you’ll want to focus on freshness and quality to guarantee the best flavor. Choose wild-caught grouse with firm flesh and no off odors for a rich, gamey taste.
Inspect the skin and feathers for cleanliness and minimal bruising, ensuring the bird’s integrity. Using well-seasoned, low-moisture wood can improve smoke flavor absorption during cooking.
Opt for whole birds or breasts of even size to promote consistent cooking. Harvest during cooler months or store properly to preserve moisture and texture. Before smoking, consider brining the grouse to enhance moisture and flavor.
Once selected, remove feathers carefully, avoiding skin damage, and promptly gut the bird to prevent spoilage. Clip wings and feet as needed, then spatchcock the grouse by removing the backbone and flattening it. Protecting the smoker from moisture during preparation helps maintain consistent cooking temperatures.
Finally, trim excess fat and connective tissue to improve smoke absorption and texture—setting you up for a perfectly smoked grouse.
Crafting the Perfect Brine
To craft the perfect brine, balance flavor and moisture, below are the essential steps and ingredients to get it just right.
Essential Brine Ingredients
Although crafting the perfect brine might seem straightforward, selecting the right combination of ingredients is key to revealing exceptional flavor and moisture in your smoked grouse.
You’ll want kosher salt for purity and precision, balanced with sweeteners like brown sugar or maple syrup to tame saltiness and add caramel notes.
Aromatics such as garlic, peppercorns, and dried herbs create depth, while liquids like cold water or chicken broth build a rich base.
These elements harmonize to infuse your grouse with savory, sweet, and earthy layers. For optimal results, brining after thawing just before cooking enhances moisture retention and flavor.
It’s also important to maintain a steady temperature consistency during smoking to ensure the brined grouse cooks evenly and retains its juiciness.
| Ingredient Type | Examples | Emotional Effect |
|---|---|---|
| Salts | Kosher, Pickling | Trustworthy purity |
| Sweeteners | Brown sugar, Honey | Warmth and comfort |
| Aromatics | Garlic, Rosemary | Inviting complexity |
| Liquids | Water, Broth | Foundation and balance |
| Spices | Peppercorns, Bay | Boldness and intrigue |
Optimal Brining Duration
Since the size and type of your bird directly influence how long it should soak in the brine, you’ll want to tailor the duration carefully to achieve the best flavor and moisture retention. Proper temperature management during cooking also enhances the final texture and juiciness of the meat.
Smaller birds like quail or chukar usually need 6-8 hours, while pheasants and mallards fare best with 8-12 hours. Larger birds demand longer—18 to 24 hours—to fully absorb flavor and stay juicy.
Don’t forget, factors like the bird’s age, meat thickness, and brine concentration also play roles in timing. Keep your brine cold and fully dissolve the salt to ensure even seasoning.
For wild birds such as grouse or chukar, it is recommended to reduce brining time to about 8 hours for optimal moisture and flavor retention.
Post-Brine Preparation
When you craft the perfect brine, every ingredient plays an essential role in transforming your grouse into a tender, flavorful masterpiece.
After brining, rinse the bird thoroughly under cold running water to wash away excess salt and avoid over-seasoning. Pat it dry with paper towels—removing moisture is vital for smoke adhesion and crisp skin.
Then, place the grouse uncovered or loosely covered in the refrigerator to dry, forming a tacky pellicle that locks in smoky flavors and guarantees even color. This drying phase also helps to improve moisture retention for juicier meat. Avoid wrapping it immediately; this drying phase usually lasts from 30 minutes to several hours.
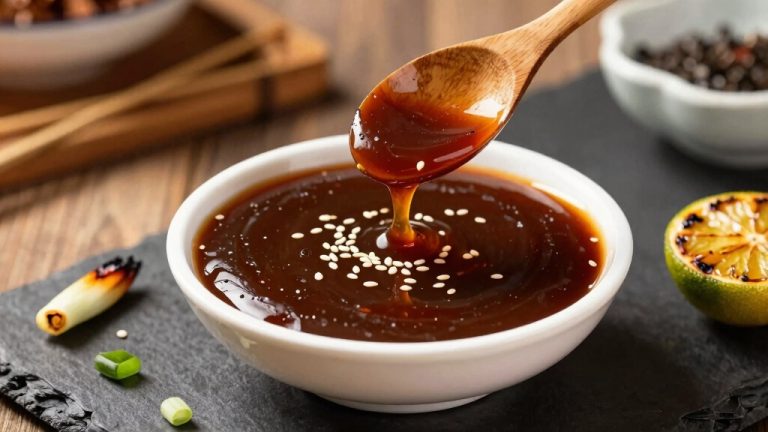
Finally, consider brushing the bird with a honey-soy glaze or applying spices post-drying to enhance complexity.
Brining Time and Techniques
Below are the key steps and timing tips to ensure your grouse stays tender, juicy, and full of flavor.
Optimal Brine Duration
Although brining times vary depending on the size and type of bird, getting the duration just right is key to releasing moist, tender smoked grouse.
For smaller birds like grouse, aim for 6 to 8 hours in a fully dissolved, cooled brine kept refrigerated below 40°F. Older or larger birds need longer—up to 12 hours—to deeply absorb moisture and flavors.
Submerge your grouse completely, turning it occasionally to ensure even coverage. Always cool the brine before adding the bird to prevent spoilage. After brining, rinse the bird thoroughly under cool water to remove excess salt.
Essential Brine Ingredients
Because the right combination of ingredients transforms a simple brine into a flavor-packed marinade, understanding essential brine components is crucial for smoking grouse. Start with kosher salt—about one tablespoon per cup of water—to enhance flavor and preserve the meat.
Balance the saltiness with sugar or natural sweeteners like honey or maple syrup. Add aromatic herbs such as rosemary and sage, plus peppercorns for subtle spice.
Toss in dried citrus peels to brighten the brine with tangy notes. Use water as your base, and consider acidifiers like vinegar for depth. Many cooks enhance flavor by using leftover pickle brine as the base, which also helps maintain moisture through brining.
Whether you choose a wet brine, soaking the bird, or a dry brine rubbed directly, keep the mixture refrigerated and turn the grouse regularly to ensure even flavor absorption.
Post-Brine Preparation
Once your brine blends have fully developed their flavors, it’s time to focus on how long to soak your grouse and the best ways to handle it during this phase.
Aim for 6 to 12 hours of brining to achieve ideal tenderness and flavor, though 4 to 6 hours works well for smaller birds or lighter seasoning. Always fully submerge the grouse, weighing it down to ensure even exposure.
For larger batches, brine quantities may need to be adjusted accordingly to ensure all birds are properly submerged in the solution. Use non-reactive containers like glass or food-safe plastic, and keep the brine chilled below 40°F to maintain safety.
After brining, drain and rinse the bird thoroughly under cold water to remove excess salt. Pat it dry and refrigerate uncovered on a rack to form a pellicle, enhancing smoke absorption and crispness during cooking. The birds should not be touched or rubbed before smoking to preserve the integrity of the brining process.
Rinsing and Drying the Bird
You’ll want to rinse the grouse thoroughly under cold running water to wash away any excess curing salt that might overpower the flavor. This step guarantees your bird isn’t too salty and prepares it for smoking.
After rinsing, gently pat the grouse dry using paper towels or a clean cloth to remove surface moisture. Proper drying is essential to prevent bacterial growth and help the smoke cling evenly to the meat.
For best results, let the grouse air dry in a well-ventilated area for about 30 minutes. Many experienced cooks recommend brining game birds for about six hours before smoking to keep the meat moist and tender during the cooking process, which enhances the final flavor brining game birds. If your grouse still has skin, decide whether to leave it on or remove it based on your preference.
Choosing Wood for Smoking
When selecting wood for smoking grouse, the type you choose will greatly influence the flavor profile of your final dish. Hardwood options like hickory, oak, maple, and pecan offer robust, sweet, or nutty flavors. It is important to always use seasoned, dry hardwoods to ensure clean smoke and avoid unpleasant flavors.
For a milder, fruitier smoke, consider cherry or apple woods, both ideal for delicate game birds. You can even blend woods—mixing hickory’s boldness with cherry’s subtle sweetness—to create a balanced taste.
Avoid softwoods due to their resin, though small branches like blackberry add a gentle, sweet touch perfect for grouse. Remember to use dry wood chunks for longer smokes or soaked chips to prevent flare-ups. Selecting the right wood means enhancing your smoked grouse with a depth of flavor that’s uniquely yours.
Smoking Temperature and Duration
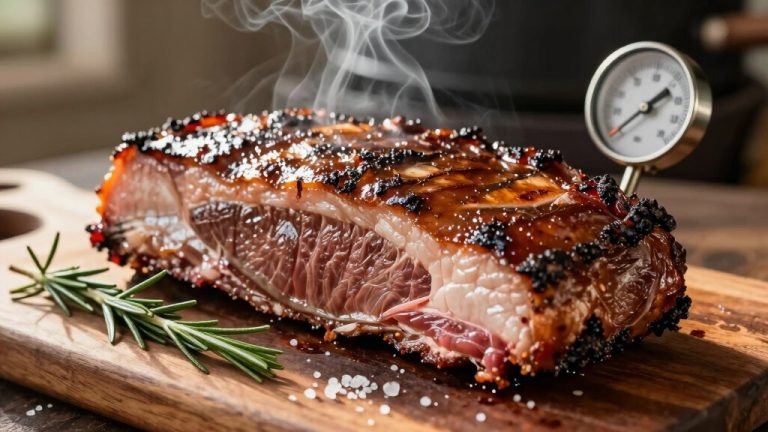
Selecting the right wood sets the stage, but controlling smoking temperature and timing shapes the final flavor and texture of your grouse. Preheat your smoker to around 220°F for a steady, even smoke that gently infuses the meat.
You can opt for a quicker smoke at 250°F, which might take about 25 minutes, but lower temperatures between 150-220°F allow for more tender, flavorful results over a longer period. Keep a close eye on your smoker’s temperature, using thermometers to prevent overheating.
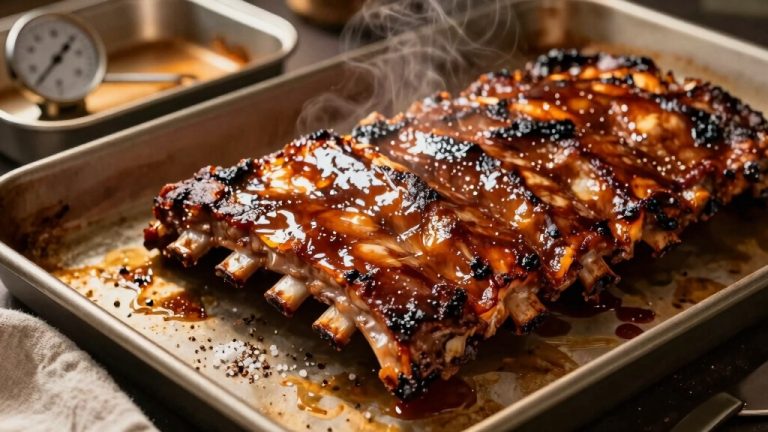
Add wood chips during the last hour to maintain fresh smoke without overpowering. Remember, smoking times vary—aim for the right internal temperature to ensure safety and juiciness. After smoking, let your grouse rest to lock in those rich, smoky flavors.
Flavorful Basting Mixtures
Although smoking imparts a rich, smoky depth to grouse, applying a flavorful basting mixture elevates the taste to a whole new level. You’ll often start with melted butter as a rich base, blending in fresh garlic and herbs like rosemary, sage, and thyme to add earthy, aromatic layers.
Sweet touches like maple syrup or honey balance the savoriness and help caramelize the skin beautifully. Don’t forget salt—it enhances flavor and locks in moisture. Apply the mixture liberally before smoking and reapply periodically to keep the meat juicy and infused with those vibrant flavors.
For extra richness, wrap the bird in bacon or prosciutto after basting. This combination creates a complex, savory-sweet profile that perfectly complements the wild game character of your smoked grouse.
The bird’s unique herbaceous aroma enhances its culinary appeal, making the smoked grouse experience even more memorable.
Serving and Enjoying Smoked Grouse
Because smoked grouse develops a tender, juicy texture as it rests, you should let it sit loosely covered with foil for 10 to 15 minutes after smoking. This resting period redistributes the juices, ensuring every bite bursts with flavor.
Slice the breast thinly against the grain to maximize tenderness and serve warm or at room temperature, depending on your dish. For crostini, cooled slices balance texture and flavor beautifully, topped with goat cheese and peppery rocket leaves.
Pair smoky grouse with sweet accompaniments like blackberry drizzle or bramble sauce to complement its richness. Serve alongside fresh greens or rustic bread to add contrast. Sharing wild food promotes dialogue on conservation.
If reheating, do so gently to preserve moisture. Whether as a main or a gourmet topping, smoked grouse shines best when presented thoughtfully with complementary flavors and textures.
Frequently Asked Questions
Can Smoked Grouse Be Safely Frozen and Reheated Later?
You can safely freeze smoked grouse if you handle it properly. Make sure it’s fresh, cleaned, and cooled quickly before freezing in airtight packaging.
When reheating, thaw it safely in the fridge or cold water, then heat it to at least 165°F to kill any bacteria. Avoid refreezing once thawed, and consume leftovers quickly.
What Side Dishes Best Complement Smoked Grouse?
You’ll want side dishes that balance smoky richness with fresh or earthy flavors. Try roasted Brussels sprouts or sautéed mushrooms to add depth and texture.
For something lighter, a mixed greens salad with vinaigrette works great to cut through the smokiness. If you prefer a smoky twist, smoked sweet potatoes or smoked green beans complement beautifully. Don’t hesitate to explore international sides like cilantro lime rice for a fresh, zesty contrast.
How to Store Leftover Smoked Grouse Properly?
To store leftover smoked grouse properly, first let it cool to room temperature with good air circulation to avoid moisture buildup.
Then, place it in airtight plastic or glass containers to keep freshness intact. Refrigerate at 40°F or below and consume within three days for the best flavor.
For longer storage, freeze it in vacuum-sealed bags at 0°F or lower, dividing portions for easy thawing and maintaining quality up to six months.
Is It Necessary to Remove Feathers Before Smoking?
Imagine you’re in a medieval kitchen, but instead of a sword, you wield a modern smoker. You’ll want to remove the feathers before smoking, as they can cause unpleasant textures and interfere with smoke penetration.
Scalding or dipping in paraffin wax helps make this easier. Leaving feathers on not only affects flavor but can also trap moisture unevenly, ruining your bird’s texture.
Can Grouse Be Smoked Using an Electric Smoker?
You can definitely smoke grouse using an electric smoker. It lets you control the temperature precisely, usually between 150°F to 250°F, which is perfect for game birds.
Just use wood chips like hickory or cherry for rich flavor, wrap the meat in bacon and herbs to keep it moist, and monitor internal temperature with a thermometer. This method guarantees tender, flavorful grouse without the hassle of unpredictable heat sources.
Savor the Flavor: Your Smoked Grouse Masterpiece Awaits
Now that you’ve mastered selecting, brining, and smoking your grouse, isn’t it time to savor the smoky, tender flavors you’ve crafted? Each step—from choosing the perfect wood to basting with rich, aromatic mixtures—builds layers of taste that’ll delight your palate.
Serve it hot, share the experience, and enjoy the rewarding result of your careful preparation. Smoking grouse isn’t just cooking; it’s creating a memorable feast that celebrates nature’s bounty.