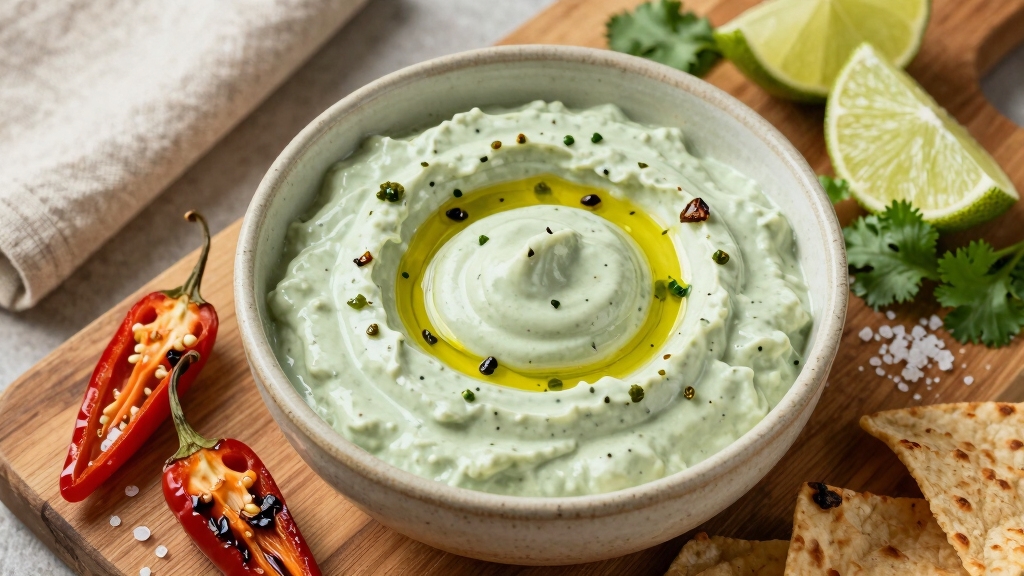
Green Chili Dip Recipe: Easy & Creamy Party Favorite
You’ll love making this creamy green chili dip by blending softened cream cheese, sour cream, cheddar cheese, and diced roasted or canned green chiles.
Mix until smooth, then bake for a bubbly, golden finish or chill for a fresh, tangy twist. Spice it up with cumin, garlic, or smoky paprika, and garnish with green onions or cilantro for a pop of color.
Keep it handy for parties. There’s even more tips to perfect your dip’s flavor and serving style ahead!
Key Takeaways
- Combine softened cream cheese, sour cream, shredded cheddar, and diced green chiles for the dip base.
- Mix spices like cumin, garlic, salt, and cayenne to enhance the flavor profile.
- Bake at 350°F for 15–20 minutes for a melty, golden top or chill for a creamy no-bake version.
- Garnish with chopped green onions, cilantro, extra roasted chiles, and a light paprika dusting for visual appeal.
- Serve warm with tortilla chips or chilled with veggie sticks, refrigerate leftovers, and reheat gently to maintain texture.
Green Chili Dip Recipe Table
| Category | Details |
|---|---|
| Main Term | Green Chili Dip Recipe |
| Recipe Type | Appetizer / Party Dip |
| Cuisine | American / Tex-Mex Inspired |
| Prep Time | 10 minutes |
| Cook Time | 15–20 minutes (baked) / 0 minutes (no-bake) |
| Total Time | 10–30 minutes |
| Servings | 6–8 servings |
| Calories (Approx) | 180–250 kcal per serving |
| Difficulty Level | Easy |
| Key Ingredients | Cream cheese (8 oz), sour cream (½–1¼ cups), shredded cheddar (1–2 cups), green chiles (4–7 oz), mayo (½ cup, optional), salsa verde (1 cup, optional), cumin, garlic, salt, pepper, cayenne/paprika |
| Instructions | Mix cream cheese + sour cream until smooth → add cheese + chiles → mix spices → optional mayo & salsa → bake at 350°F for 15–20 mins OR chill 2+ hours |
| Flavor Options | Mild (no cayenne), Medium (cumin + paprika), Spicy (add cayenne/hot chiles), Smoky (roasted Hatch chiles), Extra creamy (more sour cream) |
| Serving Suggestions | Tortilla chips, veggie sticks, crackers |
| Storage | Refrigerate in airtight container for 3–4 days |
| Reheating | Microwave or stovetop on low heat, stir well; add milk/sour cream if needed |
What You Need to Make Classic Green Chili Dip?

To make a classic green chili dip, you’ll need a handful of key ingredients that come together to create its signature creamy, tangy, and mildly spicy flavor.
Start with 8 ounces of softened cream cheese and half a cup to one and a quarter cups of sour cream for that smooth base.
Add 1 to 2 cups of shredded cheddar or cheddar jack cheese for rich cheesiness. The star is 4 to 7 ounces of diced green chiles, canned or roasted Hatch, for that authentic kick.
To deepen flavor, toss in half a cup of mayonnaise and a cup of salsa verde.
Don’t forget your spices: cumin, garlic, salt, pepper, onion powder, and a hint of cayenne or paprika to balance heat and earthiness perfectly.
For an extra layer of complexity, try incorporating smoked salt to add a subtle smoky depth that complements the dip’s bold flavors.
Baking or No-Bake: Which Green Chili Dip Method Is Best?
You’re going to love the way baking your green chili dip creates that golden, bubbly top! It really intensifies all those delicious flavors.
But hey, if you’re pressed for time or just in the mood for something cool and creamy, the no-bake version is super convenient and still tastes amazing.
Let’s dive into the perks of both methods so you can choose the perfect dip for your next snack craving. Whether you’re feeling like a warm, cheesy delight or a refreshing, chilled treat, there’s an option for you!
For an added twist, consider incorporating a vinegar-based mop sauce to enhance moisture and flavor layering in your baked dip.
Baking Benefits Explained
Although both baking and no-bake methods create delicious green chili dips, baking brings out deeper flavors and a comforting, melty texture that’s hard to beat.
When you bake the dip at 350°F for 15-20 minutes, the cheeses melt perfectly, melding with the green chiles and spices to form a rich, bubbly surface with a slight golden crust.
This process intensifies the smoky, spicy notes, making each bite more satisfying.
Baking also enhances the aroma, filling your kitchen with inviting scents that whet your appetite.
Plus, the warm dip pairs beautifully with crispy tortilla chips, offering a cozy, indulgent experience.
If you crave a dip that’s both flavorful and velvety, baking truly elevates your green chili dip to the next level.
Using parchment paper during baking ensures easy cleanup and prevents sticking, allowing you to focus on enjoying your dip.
No-Bake Convenience Factors
While baking green chili dip offers rich flavors and a melty texture, no-bake versions bring unmatched convenience and speed to your kitchen routine. You can whip up a creamy, flavorful dip in minutes without heating your oven or waiting for baking time.
No-bake dips chill and set quickly, perfect for last-minute gatherings or hot days when you want minimal kitchen heat. Properly handling kitchen tools with gradual heating techniques can enhance your overall cooking experience and safety.
| Aspect | No-Bake Dip |
|---|---|
| Prep Time | 5-10 minutes |
| Wait Time | 2+ hours chilling, no active cooking |
| Texture | Creamy, smooth |
| Flavor Profile | Fresh, tangy, bright |
With no-bake, you focus on mixing quality ingredients like cream cheese, sour cream, and diced chiles. This creates a fresh dip that’s ready to serve fast and fuss-free.
Mixing the Classic Green Chili Dip Base
Let’s kick things off by mixing together some cream cheese and sour cream until you’ve got a smooth, creamy base. Seriously, it’s like a dreamy cloud of goodness!
Next up, we’ll fold in shredded cheddar and diced green chiles. This is where the magic happens—you’re creating that perfect balance of cheesy richness with just a hint of mild heat.
And just like that, you’ve got the foundation for your classic green chili dip. Whether you choose to bake it or chill it, it’s going to be delicious!
Adding a small amount of mustard powder can help preserve moisture and enhance the overall sensory appeal of your dip.
Cream Cheese And Sour Cream
Combine softened cream cheese and sour cream to create the smooth, creamy foundation of your classic green chili dip. This duo balances richness with tang, setting the perfect stage for bold flavors.
To get started:
- Use 8 ounces of cream cheese softened at room temperature for easy mixing.
- Add ½ to 1¼ cups of sour cream, adjusting for your preferred creaminess.
- Beat the two together until completely smooth and free of lumps.
- Taste the base; this simple blend should be rich but mild, ready to harmonize with spices and chiles.
For best results and safety, it is important to refrigerate the dip after preparation to prevent spoilage and maintain freshness, as recommended for dairy-based mixtures.
Cheese And Chiles Blend
Enhance your dip’s flavor and texture by folding in shredded cheese and diced green chiles, the heart of this classic blend.
The cheese adds creamy richness while the chiles bring a vibrant, smoky heat that wakes up every bite. Choose cheddar or cheddar jack for their meltability and sharpness.
Whether you opt for canned or roasted Hatch chiles, their distinct flavor will elevate your dip from ordinary to irresistible.
Incorporating toasted sesame oil can add an extra layer of aroma and depth to complement the smoky heat.
| Ingredient | Amount | Tip |
|---|---|---|
| Shredded Cheese | 1 to 2 cups | Use sharp cheddar or jack |
| Diced Green Chiles | 4 to 7 ounces canned | Roast Hatch for smoky depth |
| Cream Cheese | 8 ounces softened | Mix first for smooth base |
| Sour Cream | ½ to 1¼ cups | Adjust for desired creaminess |
Mix gently to keep texture balanced and flavors bold.
How to Adjust Heat and Flavor in Your Green Chili Dip?
When you want to tailor your green chili dip to suit your taste buds, adjusting the heat and flavor is key to creating the perfect balance.
Start by controlling the chili intensity. Use mild chiles for a gentle warmth or add cayenne pepper for a fiery kick.
Next, balance richness by tweaking sour cream and cream cheese amounts to mellow or intensify creaminess.
For added depth, incorporate cumin and garlic gradually, tasting as you go.
Finally, salt and pepper sharpen the overall profile without overpowering the dip.
Here’s a quick guide:
- Choose your chiles: mild, medium, or hot.
- Adjust dairy ratios for creaminess.
- Add spices like cumin, garlic, and cayenne carefully.
- Season with salt and pepper to finish.
This method helps you craft a dip that perfectly suits your heat and flavor preferences. For optimal results, remember that balancing sugar and acidity enhances flavor complexity in spicy dishes.
Serving and Garnishing Tips for Green Chili Dip
Serving green chili dip is almost as important as making it. You want every bite to be as inviting as the first. Serve your dip warm, right out of the oven, so the cheese is perfectly melted and bubbling.
If you prefer chilled, let it rest in the fridge for at least two hours to meld flavors. Pair it with sturdy tortilla chips or crisp veggie sticks for ideal dipping.
For garnishing, sprinkle chopped green onions or cilantro on top to add freshness and color. A few extra diced roasted chiles or a light dusting of paprika can enhance both appearance and flavor.
To keep your dip warm and flavorful during serving, consider using a covered skillet to trap steam and maintain juiciness.
Flavor Variations and Add-Ins to Try With Green Chili Dip
Mixing things up with your green chili dip can bring exciting new flavors and textures to the table.
You can easily personalize the classic recipe by trying these add-ins:
- Roasted Corn – Adds a sweet crunch that complements the smoky heat of the chiles.
- Salsa Verde – Boosts tanginess and adds a fresh, zesty kick.
- Cumin and Garlic – Infuse warmth and depth, enhancing the dip’s savory profile.
- Chopped Cilantro or Green Onions – Sprinkle on top for a burst of herbal brightness and color.
These variations let you tailor the dip to your taste and occasion.
Whether you want something creamy, spicy, or fresh, experimenting keeps your green chili dip vibrant and irresistible every time you serve it.
Storing and Reheating Green Chili Dip: Tips and Best Practices
Preserving the fresh flavors and creamy texture of your green chili dip means knowing how to store and reheat it properly.
Mastering storage and reheating is key to keeping your green chili dip fresh and creamy.
After enjoying your dip, transfer leftovers into an airtight container and refrigerate within two hours to keep it fresh up to 3-4 days.
Avoid leaving it out to prevent spoilage.
When reheating, gently warm the dip in a microwave-safe dish or on the stovetop over low heat, stirring frequently to maintain smoothness and prevent burning.
If it thickens too much, add a splash of sour cream or milk to restore creaminess.
For baked dips, cover with foil while reheating to keep moisture in.
Always reheat until the internal temperature reaches 165°F to ensure safety and preserve flavor.
Frequently Asked Questions
Can I Freeze Green Chili Dip for Later Use?
Yes, you can freeze green chili dip for later use, but expect some texture changes.
When you thaw it, the creamy base might separate slightly, so give it a good stir or blend it again to restore smoothness.
Freeze in airtight containers or freezer bags, portioned for convenience.
Avoid freezing if your dip has lots of fresh ingredients like salsa or corn, as they can become watery after thawing.
What Type of Cheese Melts Best in Green Chili Dip?
Cheese that melts best in green chili dip is cheddar or cheddar jack. After all, you can’t make an omelet without breaking eggs.
These cheeses melt smoothly and add a rich, creamy texture that complements the heat of the chiles perfectly.
Their sharp, tangy flavor enhances the dip’s depth, while their gooey consistency makes every bite irresistibly luscious.
For an extra creamy touch, mixing in some cream cheese helps too.
Are There Dairy-Free Alternatives for Green Chili Dip?
Yes, you can definitely make dairy-free green chili dip!
Try using plant-based cream cheese or cashew cream instead of cream cheese and sour cream. Nutritional yeast adds a cheesy flavor, while dairy-free shredded cheeses made from coconut or almonds melt well.
Blend these with your chiles, spices, and a bit of salsa verde for richness. This way, you’ll enjoy that creamy, spicy dip without any dairy, perfect for vegan or lactose-intolerant diets.
How Long Can Green Chili Dip Be Left Out Safely?
You might think leaving that creamy dip out all day is a great idea. After all, who wouldn’t want warm, spoiled dairy?
But in reality, you should only leave your dip out for about two hours max. Beyond that, bacteria throw a wild party, turning your tasty treat into a risky gamble.
Keep it chilled until serving, and you’ll enjoy every bite—safe, fresh, and delicious, just as it’s meant to be.
Can I Make Green Chili Dip Ahead for Parties?
Yes, you can definitely make green chili dip ahead for parties.
Prepare it up to two days in advance, then chill it well in the refrigerator.
This not only saves time but also lets the flavors meld beautifully.
If you’re baking it, wait to bake until just before serving to keep it warm and bubbly.
Just remember to keep it refrigerated until about 30 minutes before guests arrive for the best taste and safety.
Turn Up the Heat: A Dip Worth Every Scoop
Now that you’ve discovered the secrets behind that irresistible green chili dip, you’re just a few simple steps away from a flavor fiesta.
Whether you choose to bake or skip the oven, this dip promises to warm hearts and tantalize taste buds. Play with heat and add-ins to make it your own signature creation.
Store it wisely, serve with flair, and watch it disappear because once you try it, there’s no turning back from this delicious delight.