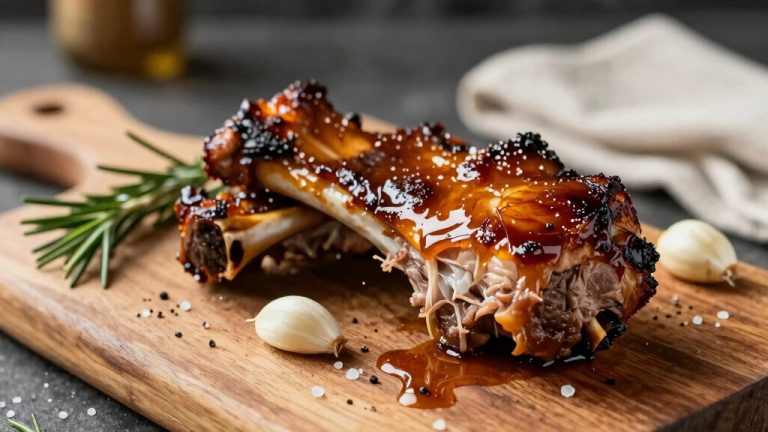
Brown Sugar Rib Recipe: Sweet, Sticky BBQ Perfection
Choose tender baby back or flavorful St. Louis ribs, removing the membrane for better seasoning. Rub them generously with a balanced mix of brown sugar, salt, smoked paprika, and spices.
Cook low and slow, either wrapped in foil in the oven, in a slow cooker, or on indirect grill heat, until tender. Finish by brushing a sweet brown sugar glaze and broiling briefly for a glossy caramelized crust.
Perfect ribs are all about careful prep, cooking, and finishing techniques. Discover how to master each step for irresistible results.
Key Takeaways
- Choose ribs (baby back or St. Louis-cut) for balance with brown sugar’s sweetness and remove the membrane for tender meat.
- Create a dry rub with 20–50% dark brown sugar, kosher salt, smoked paprika, garlic powder, and ground mustard for rich flavor.
- Pat ribs dry, apply rub generously on both sides, and let rest at least 30 minutes for deep flavor absorption.
- Cook ribs low and slow in the oven at 250–325°F for 1½ to 3½ hours, wrapped in foil to retain moisture and tenderness.
- Finish by brushing with a brown sugar glaze and broiling briefly to caramelize for a sticky, flavorful crust.
Recipe Table for Sweet and Sticky Brown Sugar Ribs
| Ingredient / Tool | Action / Step | Tips / Notes |
|---|---|---|
| Baby back or St. Louis ribs (2½–3 lbs each) | Choose ribs | Baby backs are lean and tender; St. Louis provide meatier texture |
| Membrane on rib back | Remove membrane | Use a sharp knife to loosen and a paper towel to grip |
| Dark or light brown sugar (20–50% of rub) | Mix with salt & spices | Dark sugar gives rich molasses flavor; light sugar is milder |
| Kosher salt | Combine with sugar for rub | Balances sweetness |
| Smoked paprika, garlic powder, onion powder, ground mustard | Add to rub | Enhances smoky, savory depth |
| Ribs | Pat dry and apply rub | Massage rub into all surfaces; let rest 30+ minutes |
| Oven (250–325°F), Slow cooker (low), Grill (indirect heat) | Cook ribs low and slow | Oven: 1½–3½ hrs; Slow cooker: 6–8 hrs; Grill: 2–6 hrs |
| Brown sugar glaze (½–1 cup sugar + liquid) | Brush before broiling | Apply thin coats; broil 7–9 minutes for caramelization |
| Meat thermometer | Check internal temp | Ideal: 190–200°F for tender, juicy ribs |
| Serving tools / plates | Rest ribs 10–15 mins | Allows juices to redistribute and glaze to set |
Choose the Best Ribs for Brown Sugar BBQ

When you’re choosing ribs for brown sugar BBQ, selecting the right cut makes all the difference in flavor and texture.
Baby back ribs, lean and mild, cook quickly and pair perfectly with sweet brown sugar glazes. If you want richer, meatier ribs, spareribs offer higher fat content that stands up well to long cooks and deep caramelization.
Because spare ribs develop a thicker bark, they provide a satisfying crust that complements the sweetness.
St. Louis-cut ribs, trimmed into uniform rectangular racks, provide even browning and easy glazing. Stick with ribs; they balance sweetness better than beef ribs, whose bold flavor can overwhelm brown sugar’s delicate notes.
For the best results, it’s important to apply dry rub generously to both sides before cooking to enhance flavor.
Look for racks weighing around 2.5 to 3 pounds; they offer just the right surface area for a luscious sugar rub without risking burnt crusts.
Choosing the right ribs sets the stage for a perfectly sweet, tender BBQ experience.
Prepare Ribs for Maximum Flavor and Tenderness
To really amp up the flavor and tenderness in your ribs, the first step is to pick the right cut that fits your taste and cooking style. There are so many options out there, so take a moment to think about what you enjoy most!
Plate ribs and short ribs have distinct textures and fat content, so understanding their differences can help you choose the perfect cut for smoking.
Once you’ve got your ribs, the next thing you want to do is remove that tough membrane on the back. Trust me, it makes a huge difference! Be sure to cut through the silver skin with a very sharp knife to make removal easier and ensure better seasoning penetration.
By taking it off, you allow the seasonings to really soak in and help keep the meat nice and tender.
Now, let’s talk about the rub. You’ll want to go heavy on that brown sugar rub! Don’t be shy—really massage it into every nook and cranny.
This is what’s going to give you that amazing caramelized crust we all love. Just picture those ribs sizzling away, coated in that sweet, sticky goodness.
For best results, consider applying a dry rub before slow smoking at consistent temperatures to maximize tenderness and flavor development.
Choosing The Right Cut
Although choosing the right cut of ribs might seem straightforward, it plays an essential role in achieving maximum flavor and tenderness in your brown sugar ribs recipe.
Picking the perfect ribs makes certain your brown sugar rub soaks in properly and the cooking time matches the meat’s texture. Here’s what to weigh:
Baby back ribs are leaner and more tender, perfect if you want a shorter cooking time, as their muscle composition requires less breakdown of connective tissue.
Spare ribs offer more meat and fat, ideal for slow cooking to develop deep flavors.
St. Louis-style ribs provide a uniform, meaty texture needing slightly longer cooking than baby backs.
Selecting ribs around 2½ to 3 pounds each will give you a perfect balance of flavor and tenderness for your dish.
Using a slow cooker helps ensure the ribs cook low and slow until fall-apart tender, making the process effortless and reliable.
Removing The Membrane
Peeling off the thin membrane from the bone side of your ribs releases the secret to richer flavor and tender texture in your brown sugar ribs recipe.
This silver skin blocks seasonings and smoke, making ribs chewy and less flavorful.
Many cooks find that starting the separation from the middle of the rack rather than an end helps reduce tearing and makes removal smoother middle of rack.
To remove it, slide a blunt knife under the membrane, loosen it, then grip with a paper towel and pull steadily. Cold ribs help the membrane come off in one piece.
Wrapping meat during cooking can help retain moisture and improve tenderness by trapping steam and heat, similar to how brisket is often wrapped to manage the stall phase.
| Step | Tool Needed | Tip |
|---|---|---|
| Loosen membrane | Dinner knife | Slide gently under one bone |
| Grip membrane | Paper towel | Improves traction on slippery |
| Pull membrane | Hands | Pull steadily in one motion |
| Prep ribs | Cutting board | Place bone side up, thicker end closest |
Applying Brown Sugar Rub
Once you’ve removed the membrane, your ribs are ready to fully absorb the rich, sweet, and savory flavors of the brown sugar rub. Properly patting the ribs dry before applying the rub helps form a pellicle that improves seasoning adhesion.
Start by breaking up any clumps of dark brown sugar to guarantee even coverage. Combine the sugar with kosher salt, smoked paprika, black pepper, garlic powder, and a touch of ground mustard for brightness.
Apply the rub generously on both sides of the ribs, pressing firmly to help the seasoning adhere and penetrate the meat. For best results, bake the ribs at 325° F to achieve tender, fall-off-the-bone texture that complements the rub’s flavor oven method.
Let the rubbed ribs rest for at least 30 minutes before cooking to allow deeper flavor absorption.
Remember:
Mix the rub thoroughly before applying for consistent flavor.
Apply on slightly moist ribs to improve adhesion.
Secure an even, complete coating to create a caramelized crust during cooking.
This method guarantees ribs bursting with balanced sweetness, spice, and depth.
Make the Perfect Brown Sugar Dry Rub
Crafting the perfect brown sugar dry rub sets the foundation for ribs bursting with balanced sweetness, spice, and savory depth. Start with 20–50% brown sugar, using dark brown for rich molasses flavor or light brown for milder sweetness.
Balancing the sugar with salt content around half to equal the sugar volume ensures seasoning without overpowering.
Mix in salt at about half to equal the sugar volume to season without overpowering. Add smoked paprika and garlic powder for smoky color and umami depth, plus onion powder to round out the aroma.
Many recipes, including popular versions, recommend adding chili powder and cayenne pepper for a spicy kick, often balanced with seasonings like Montreal Steak Seasoning or Stone House Seasoning to enhance the overall flavor profile.
Adjusting heat can be done gradually by varying cayenne and red pepper flakes to suit your taste.
For subtle heat, incorporate cayenne or chili powder sparingly, using 0.5 to 2 teaspoons per quarter cup sugar to complement without dominating. Break up clumps of fresh, soft brown sugar with a fork before blending all ingredients.
This method ensures an even, aromatic rub that caramelizes into a glossy, flavorful crust, essential for show-stopping ribs. Store your dry rub in an airtight container to maintain freshness for up to six months.
Cook Brown Sugar Ribs in the Oven (Step-by-Step)
Preheat your oven between 250°F and 325°F to create the ideal environment for tender, flavorful brown sugar ribs. Wrapping the ribs tightly in foil helps retain moisture and enhances flavor development during cooking.
Start by removing the membrane on the bone side to enhance tenderness and seasoning absorption.
Place the ribs bone-side down on a foil-lined baking sheet to catch drips and ease cleanup.
Wrap the ribs tightly in foil to trap steam and keep the meat moist during baking.
Bake ribs for 1½ to 3½ hours, adjusting time based on oven temperature and desired tenderness.
For moist ribs, consider adding an oven-safe dish of water to increase oven humidity.
Once tender, unwrap and brush ribs with brown sugar sauce before broiling briefly to caramelize.
This method guarantees juicy, flavorful ribs with a perfectly sticky, caramelized finish.
Slow Cook Brown Sugar Ribs for Tenderness
When you’re slow cooking your brown sugar ribs, it’s important to keep the temperature low and steady. Aim for about 6 to 8 hours on low or 3 to 5 hours on high.
This way, you’ll achieve that perfect tenderness we all crave! Maintaining an internal temperature within the safe cooking range ensures both safety and optimal texture.
Now, let’s talk about moisture. Keeping those ribs juicy is key! Just a splash of water or cooking them in a delicious sauce can really help create a great braising environment.
The recipe suggests using a sauce made with soy sauce, brown sugar, and seasoned rice vinegar for balanced flavor.
And don’t forget, timing is everything! You’ll want to cook them until they’re tender but still hold their shape. That way, they’re all set for that final caramelized finish that makes them truly irresistible!
Ideal Temperature Range
Although ribs reach a safe internal temperature at 145°F, you’ll want to cook your brown sugar ribs much longer and hotter to release that tender, fall-off-the-bone texture.
The magic happens between 185°F and 200°F, where collagen breaks down into gelatin, making ribs juicy and soft. Slow cooking on low heat around 190–200°F for 6–8 hours is ideal for that sublime tenderness.
The recipe typically uses about 6 pounds of ribs, which is enough to serve about six people. To keep ribs warm after cooking without drying them out, consider wrapping them loosely in butcher paper or foil to retain moisture and texture.
Alternatively, a high setting cooks ribs faster but yields slightly firmer meat. Aim for 185–195°F for tender yet sliceable ribs.
Slow cooker low setting maintains 190–200°F, perfect for collagen breakdown. Adjust time based on rib type: baby backs cook faster than meatier St. Louis ribs.
Stick to these temp ranges, and your brown sugar ribs will melt in your mouth every time.
Moisture Retention Techniques
Mastering the ideal temperature range sets the stage, but keeping your brown sugar ribs juicy depends largely on how you manage moisture during slow cooking.
Use just a splash of liquid—water, broth, or sauce—since rendered fat and natural juices create a self-basting environment inside the slow cooker. Make sure to dry thoroughly any surfaces after cooking to prevent mold and odors.
The tight lid traps steam, circulating it around the ribs to prevent drying and promote even moisture. This method is especially effective when cooking on low for longer periods, as the slow cooker low setting gently breaks down connective tissue for tender meat.
Arrange ribs snugly or line the crock to minimize exposed surfaces and slow evaporative loss. Your brown sugar rub plays a key role, attracting surface moisture that dissolves into a syrupy glaze, enhancing water retention.
Finally, leaving some fat intact allows internal basting as it renders. Resting the ribs after cooking lets juices redistribute, locking in tenderness and juiciness.
Timing And Tenderness
Since timing directly influences tenderness, understanding how different slow cooker settings affect your brown sugar ribs is essential.
Slow cooking lets you tailor texture precisely—whether you want ribs that just yield to a fork or fall off the bone. Here’s what to keep in mind:
Use low heat for 6-7 hours to achieve that coveted fall-off-the-bone tenderness.
Opt for high heat if you’re short on time; 3-3.5 hours produces tender ribs with a slight chew.
Medium heat cooks ribs in 4-6 hours until they’re fork tender but still hold shape.
Check ribs halfway through to adjust timing based on your cooker’s wattage and your preferred doneness.
For best flavor and ease, consider using a bottled BBQ sauce like Sweet Baby Rays to coat the ribs during slow cooking.
Grill Brown Sugar Ribs With Indirect Heat
When you grill brown sugar ribs with indirect heat, you create the perfect environment to gently render fat and caramelize sugars without burning them.
Set up a two-zone fire by placing coals or burners on one side, leaving the opposite side empty or with a drip pan.
Lay your ribs bone-side down over the cool zone, ideally above a water pan to maintain moisture. Using a gas grill for this method allows you to avoid turning on the oven when outdoor heat is already high and eliminates the need for additional smoker equipment, making it practical and repeatable.
Keep your grill lid closed, creating an oven-like convection that cooks ribs slowly at 250–300°F.
This low-and-slow method prevents flare-ups from dripping fat and sugar while ensuring tender, juicy meat.
Depending on temperature, expect 2 to 6 hours of cooking until ribs reach 190–200°F internally and the meat pulls slightly from the bones, delivering perfectly caramelized, tender brown sugar ribs.
Make a Sweet and Sticky Brown Sugar Glaze

Often, the secret to irresistible brown sugar ribs lies in crafting a sweet and sticky glaze that perfectly balances rich caramel notes with a tangy brightness.
The key to irresistible brown sugar ribs is a sweet, sticky glaze balancing caramel richness and tangy brightness.
To achieve this, start with ½ to 1 cup packed brown sugar per rack, combining it with an equal or slightly greater amount of liquid like apple cider vinegar or bourbon.
Add butter for gloss and silkiness. Simmer the mixture gently, stirring often, until it thickens to a syrupy, ribbon-like consistency.
Key tips include:
Use acidic liquids to cut sweetness and brighten flavor.
Incorporate honey or molasses for extra stickiness and depth.
Finish with warm spices and vanilla for complexity.
Apply the glaze in thin coats near the end of cooking for a luscious, shiny finish that clings perfectly. Sautéing onions and garlic in oil before adding the glaze ingredients enhances depth of flavor.
How to Caramelize Brown Sugar Ribs Without Burning?
Getting the perfect caramelization on your brown sugar ribs without burning them takes careful temperature control and patience.
Cook your ribs low and slow at 250°F on the grill or 300°F in the oven to gently break down connective tissues while allowing the sugar rub to caramelize evenly.
Use a two-zone grill setup, placing ribs away from direct coals to avoid high heat. Wrap ribs in foil with apple cider and brown sugar liquid; this steaming environment keeps moisture in and prevents charring.
For added flavor depth, you can baste the ribs occasionally with a homemade sauce containing brown mustard and cider vinegar.
During the final stage, brush the BBQ sauce and broil for just 7–9 minutes, flipping halfway to achieve an even amber glaze.
Monitor closely; the sugar turns amber around 10 minutes and caramelizes fully with brief, controlled heat, resulting in tender, sweet, perfectly caramelized ribs without a burnt edge.
Rest and Serve Brown Sugar Ribs for Best Results
After achieving that perfect caramelized glaze on your brown sugar ribs, letting them rest before serving releases their full flavor and texture potential.
Resting allows muscle fibers to relax, juices to redistribute, and the brown sugar glaze to set into a flavorful crust.
This step improves moisture, tenderness, and taste profoundly.
To rest and serve your ribs for best results, keep these tips in mind:
Allow a minimum 10–15 minute rest loosely tented at room temperature to reduce juice loss and enhance juiciness. Short resting times can significantly reduce liquid loss; for example, a 10-minute rest can cut liquid loss by 60% liquid retention.
For longer holding, wrap ribs in foil and insulate or place in a pre-warmed cooler to maintain warmth without drying.
Monitor internal temperature to benefit from carryover cooking, reaching the ideal 200–205°F for tender, gelatin-rich ribs without overcooking.
These practices make certain your brown sugar ribs deliver maximum succulence and flavor.
Frequently Asked Questions
Can I Substitute Light Brown Sugar for Dark Brown Sugar in the Rub?
Yes, you can substitute light brown sugar for dark brown sugar in your rub without any trouble. The flavor will be a bit milder, with less molasses depth, but the sweetness stays about the same.
If you want that richer taste, just stir in a teaspoon of molasses. Both sugars weigh the same and work interchangeably, so your ribs will still get that great caramelized crust and balanced taste you’re aiming for.
How Should Leftover Brown Sugar Ribs Be Stored Safely?
You’ll want to tuck those ribs away quickly to keep their charm intact.
Cool them to room temp within two hours, then wrap tightly in plastic wrap and foil or use a vacuum-sealed bag.
Store in the fridge at 40°F or below for 3–4 days, or freeze them for up to 2–3 months to preserve flavor and moisture.
Always chill before freezing to avoid texture troubles later.
What Side Dishes Pair Best With Brown Sugar Ribs?
You’ll want sides that balance the sweet, smoky richness of your ribs.
Creamy mashed potatoes or cheesy mash add comforting depth, while sweet potato fries bring natural sweetness that complements the glaze.
Crisp coleslaw cuts through the richness with tangy freshness, and grilled veggies add charred brightness.
For extra comfort, mac and cheese or buttery Texas toast offer indulgence, making every bite of your meal perfectly satisfying and well-rounded.
Can I Use a Meat Thermometer to Check Rib Doneness?
You can’t judge a book by its cover, and ribs aren’t done just by looks.
Yes, you can use a meat thermometer to check rib doneness, but it’s best as a guide, not the sole judge.
Insert the probe between bones, avoiding bone contact, aiming for 195–203°F for tender ribs.
Pair temperature checks with texture tests like the bend or toothpick test for perfectly juicy, fall-off-the-bone results every time.
Is It Possible to Make Brown Sugar Ribs Gluten-Free?
Yes, you can definitely make brown sugar ribs gluten-free.
Just swap out any traditional soy sauce or BBQ sauce for gluten-free versions, like tamari or gluten-free BBQ sauce.
Use pure brown sugar and single-ingredient spices to build your rub.
Be sure to avoid pre-made mixes with hidden gluten and clean your cooking tools thoroughly to prevent cross-contact.
This way, you’ll enjoy tender, flavorful ribs without worrying about gluten.
Serve These Brown Sugar Ribs and Impress Every Guest
You might think brown sugar ribs are just sweet and sticky BBQ, but they’re actually a masterclass in patience and precision.
You’ve chosen the best cut, rubbed it right, and cooked it low and slow. Yet the real magic happens when you resist devouring them immediately.
Letting those ribs rest feels like a cruel joke, but it’s what turns good ribs into unforgettable ones. So, savor the wait—you’ve earned every tender, caramelized bite.